Showing posts with label Windows. Show all posts

Six Big Windows 8 Features for Small Business

With Microsoft's big BUILD conference right around the corner on September 12, people are buzzing about the Windows 8 news that's sure to come, and for the last couple of weeks, Microsoft has been parceling out information. So far, the features we’ve seen look colorful, fast, flashy, and flexible—but how much of a difference will they make for small business users?

Let's take a look at the Windows 8 features that have already been revealed and see what kind of an impact they could make--for better or for worse.

1. That Metro Experience
The first thing you’re likely to notice in a Windows 8 demo is the new Metro style and the fluid movement on the screen. Designed to be similar to the beautiful Windows Phone 7 interface, Windows 8 uses live tiles to surface need-to-know information right from the start. Live tiles are small, tap-able color blocks that display specific information--such as how many email messages are waiting for you or what your next appointment in town is about.

The Start screen in Windows 8
To launch a program, you can tap the tile that represents it, or flick from the right edit of the screen to display the controls, then tap a button to launch the program you want to use. Once you're finished with that task, flick it away--or move it up to the corner of the screen out of the way--and tap a different program tile to open it. This means you can open and close and rearrange pieces of information on your desktop in much the same way you would on your physical desk.

A Windows 7 feature called Snap enables a side-by-side workspace experience. For example, you can add new customers to your contact list while watching a demo of a new sales training video, all using the same simple gestures as on your touchscreen smartphone.

2. It’s Keyboard and Mouse-Friendly, Too
If you’re a holdout with a mobile phone without touch capability, or you're using a notebook that doesn’t support touch, you may worry that Windows 8 won’t work for you. The design of Windows 8 is driven by an OS that's supposed to run seamlessly on touchscreens and smart devices--with a fluid design for ultraportables, easy adaptability to mobile technologies, and an always-on, always-connected approach.


however, your keyboard and mouse should still work the way they always have. Familiar keys like PageDown and PageUp will work; the Windows key still brings up the start menu; and you'll be able to navigate through programs and apps using the same point-and-click method as in Windows 7.
The flexibility of Windows 8 should enable you to switch easily back and forth between the Metro and the desktop views, so the way you interact with your PC will depend on what you want to do and what feels most natural. You might, for example, use Metro while you browse the Web, watch media, preview a presentation, or check email--but switch to Desktop view when you want more precise control of files, folders, or data.

3. Faster Boot, Faster Sleep
Another potential perk in Windows 8 is that it's meant to enable your computer to launch into life almost as soon as you push the power button. Microsoft Vice President Mike Angiulo said in a demonstration in June that startup times of 6 or 7 seconds should be possible.

Additionally, when you wake your sleeping computer, it should return from sleep instantly--which would be a relief after the horrors of Windows Vista and the improved but still lagging wake-up rate of Windows 7. When you’re on a client visit, for example, your computer can be a more natural part of the process. You should have fewer delays when you want to show off a new design, share a proposal, or demonstrate a Web app once you open your notebook.

4. Smooth Data and App Sharing--in the Cloud and Out
While Windows 8 developments are unfolding, Microsoft has been taking big steps in the online realm by launching Office 365, a new cloud computing service for small and large businesses. It's also promoting Office Web Apps, SkyDrive, and Azure as ways to collaborate in the cloud and reduce your IT overhead and hardware investments.

Working in the cloud means you and your team can work together virtually using the online version of tools that keep teams running smoothly in the face-to-face world: real-time communication, team meetings, task assignments, project management, file libraries, and workflow and reporting options.

We don’t yet know any specifics about Windows 8 features that engage the cloud directly, but the OS will support app-to-app sharing (think of how your Twitter posts show up in your other social media accounts), so the convergence is likely on the way.

Windows 8 will also natively support USB 3.0, which should allow you to access and transfer files up to 10 times faster than USB 2.0. And that hopefully means a little less time standing in front of the room waiting for your presentation to load.

5: A Windows Explorer Makeover
Over the last week or so, Steven Sinofsky, president of Microsoft's Windows and Windows Live division, has written on the Building Windows 8 blog about some of the changes we can expect to see in Windows Explorer. In Windows 8, you should be able to copy, move, rename, and delete files--especially large groups of large files--faster and with better control. You should see the status of multiple file operations and even pause the ones that are slowing things down.

Another hoped step toward improved efficiency comes when Windows 8 finds a naming conflict while you’re moving or copying files. If you try to drag a group of files to a folder that already contains files with those same names, Windows 8 will prompt you--and show a smart Choose Files dialog--to click the files you want to keep.

The big improvement appears to be that you will see a number of the conflicts in a single dialog box, along with the information needed to make the choice. And if you’re still confused about which logo file you want to use, you can click the thumbnail to open the file and find out for sure.

What’s not clear is what will happen when you have, say, 20 file conflicts in the same operation—will the dialog box have tabs? Will you still have to click through multiple choices (similar to Windows 7)? That remains to be seen.

The menu and toolbar in Windows Explorer will be replaced with a ribbon layout, similar in style to the one in Office 2010 and the Office Web Apps. Depending on whether you love or hate the ribbon toolbar, you may like (or not) having the ability to touch your way through the Home, Share, and View tabs. Similar to the ribbon in Office 2010, the Windows Explorer ribbon includes contextual tabs to help you find the tools you need based on the tasks you’re performing. And in case you just can't deal with the ribbon or prefer to stick with the keyboard, developers are adding something in the neighborhood of 200 new keyboard shortcuts.

6. Is There an App for That?
The future of Windows 8The Windows 8 App Store has lots of folks speculating. Is it real? What types of apps will it include? Windows 8 is designed for ultraportable and always-on computing, and to be truly competitive in a mobile and ever-evolving market, a Windows 8 App Store is a must.

Windows 8 will be built on HTML 5, Javascript, and CSS. Microsoft VP Mike Angiulo says developers will be able to develop apps for Windows 8 right out of the box. What’s more, Windows 8's sensor platform and support for roaming and location-based apps are likely to find creative development and a storefront on your computer in the form of the Windows 8 App Store.

Even though we’re still working with early information--and much more will be revealed at BUILD--the Windows 8 features we've seen so far have appeal for small businesses. What’s not to like about faster processing, a sleek touch-driven interface, true multitasking, seamless and quick file management, and easy app sharing? If these features deliver as promised, they will make common computing tasks more fluid and natural, freeing you up to focus on the work instead of the technology.

Microsoft gives further peek at Windows 8

SAN FRANCISCO — Microsoft on Tuesday provided another glimpse at changes coming with the next-generation of Windows software that powers most of the world's computers.

Microsoft is making major improvements to a key Windows Explorer file management program to enhance how it interacts with the coming Windows 8 operating system, according to Windows division president Steven Sinofsky.

"Windows 8 is about reimagining Windows, so we took on the challenge to improve the most widely used desktop tool (except maybe for Solitaire) in Windows," Sinofsky said atop a blog post detailing Explorer modifications.

"Windows Explorer is a foundation of the user experience of the Windows desktop and has undergone several design changes over the years, but has not seen a substantial change in quite some time," he added.

A control "ribbon" for commands was added to make them more easily accessible to people other than "power users" familiar with Windows Explorer shortcuts.

Engineers set out to "return Explorer to its roots as an efficient file manager and expose some hidden gems" in the form of handy commands many people may not know, according to Alex Simmons of the program management team.

Microsoft in June provided the first sneak peak at the successor to Windows 7, a next-generation operating system designed to work on both personal computers and touchscreen tablets.

Sinofsky demonstrated some of the features of the operating system code-named "Windows 8" at a D9 technology conference hosted by All Things Digital.

"Laptops, slates, desktops -- all can run one operating system," Sinofsky said.

"Windows 8" builds upon many of the features in Microsoft's latest mobile operating system for smartphones, Windows Phone 7, including the use of touch "tiles" instead of icons to launch and navigate between applications.

Microsoft has promised to reveal more features of Windows 8, which uses Internet Explorer 10 as a Web browser, at its developers conference in Anaheim, California, opening on September 13.

Performance testing tool for HDD / DVD / SSD / Flash disks

HD Speed is a free tool to check the performance of your hard drive, CD /DVD drives, Solid State Disks, Flash disks, Memory cards Etc. It is a standalone application. It will display a real time graph along with the average / current data transfer speed. This will help you to compare the performance of products like memory cards and pen drives. This tool is very helpful to check the computer performance when the PC got hung due to HDD errors. This application support a logging facility for the future reference also. You can freely download the software from Steelbytes

Remove Write Protection from USB

Hi friends .. I think all of us have gone through the Error "The disk is Write Protected". But only some of us have really got the chance to overcome this error without format his or her system. Itsis because sometimes when this error occurs due to virus attack, we assumes that format is the only option to overcome with this. Today we will show you the way to Remove Write Protection from the USB drive. One thing I need to say before discussing is that most of the time this Error occurs from the Operating System, not due to the USB device.  So to Remove Write Protection from the USB we need to change some Registry Values.

First have a look of the error you can get due to Write Protection on the Disk:
  • Cannot copy files and folders, disk is write Protected.
  • Cannot format the drive, Drive is write protected.
  • The Disk is write protected.
  • Remove write protection or use another disk.
  • Media is write protected.

One more thing is to note is that Write Protection on any portable USB Drive can be applied by the physical lock provided on the card adjuster or sometimes provided on the pendrive, so make sure that your pendrive is not write protected by the physical lock.
But even after moving the physical lock for write protection, the problem continues, then follow the procedure below to remove the write protection:

1. Open Start Menu >> Run type regedit and press Enter. This will open Registry Editor.

2. Navigate the following path:

        HKEY_LOCAL_MACHINE\SYSTEM\CurrentControlSet\Control\StorageDevicePolicies

Note:  If the registry key StorageDevicePolicies does not exist, you will need to create it.

3. Double click the key WriteProtect in the right panel and set the value to 0 in the Value Data Box and press OK button.

4. Exit Registry Editor and restart you system. and check for the problem again.

Now its done...:) 
Use this and share you thoughts here... if you have any other way to solve this problem or for some other problem you can share with us.
Your suggestions are always welcome....:)

Links:
1. SpeedUp Folder Browsing
2. Start computer in 10 sec

Multiple Login in Yahoo Messenger

Hi friends... This is my first post on HariGeek.com and i hope you all will like it. This is first time I am writing article on any site so I am expecting your feedback, It will help me to enhance my writing skills. So this comes my first post on "Multiple Sign In in Yahoo Messenger".

If you have multiple Yahoo ID's and wants to Login with more than one ID at the same time then don't worry, you can login with more than one yahoo ID at the same time. There is no need to install any other yahoo multi messenger version, you can easily convert your normal yahoo messenger to multi messenger and enjoy your all ID's at the same time.
Follow the following steps to convert your Yahoo messenger to MultiMessenger Version:

1. Click on Start button and then go to Run, type regedit in Run option and press enter.

2. In Registry Editor locate the location to HKEY_CURRENT_USER/Software/Yahoo/Pager/Test


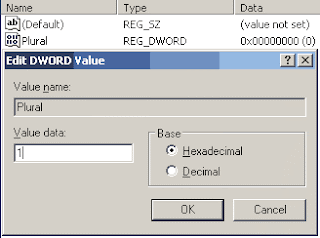
3. Here in right side panel, Right Click to create a new Dword
with name Plural and give it value 1

4. Now close the registry editor and restart your computer after any changes to go into effect.

5. For SignIn open more then one yahoo messenger, open as you want and sign in through you different ID's

6. If you want to disable the multi-messenger option then again open Registry Editor and change Plural
value 1 to 0

So friends try it and share you experience with us. Your feedback is very important for us....:)

Speedup Folder Browsing

You may have noticed that everytime you open my computer to browse folders that there is a slight delay. This is because Windows XP automatically searches for network files and printers everytime you open Windows Explorer. To fix this and to increase browsing significantly:
1. Open My Computer
2. Click on Tools menu
3. Click on Folder Options
4. Click on the View tab.
5. Uncheck the Automatically search for network folders and printers check box
6. Click Apply
7. Click Ok
8. Reboot your computer

Start Computer in 10 Seconds

Hi Friends today i am going to share a small but effective trick, by which u can reduce time taken by your computer to start. This will work on  WindowsXP. So below is the steps to reduce your system's boot time:


1. Click on the start button then press R it will take u to Run well go to run and type Regedit
press enter this will open Registery Editor.

2. Now look for the key

HKEY_LOACAL_MECHINE\SYSTEM\CurrentControlSet\Control\ContentIndex
now there find the Key Called “Startup Delay”
Double Click On It
Now where its Base
Click Decimal
 its Default Value Is 4800000
Change The Value To 40000
here u go u have done it
now close the Registery Editor and Restart Your Computer
see the result and  share your experience....:)

Install Windows XP using USB Flash Disk/ Flash Drive - Step by Step Guide

From the long time i was facing difficulty with my labtop because it doesn't have CD-Rom and I wants to format it. And after searching the whole web i got tutorial  about the "Installation of  WindowXP using Pen drive/Flash Drive". Now i am sharing it with all of you.
If you want to install Windows XP, but your notebook (or PC) has no CDROM, you should install Windows XP using USB Flash disk/Flash Drive/Thumb drive...
just follow this guide :
Step 1:
When you do this tutorial, please make sure your computer/laptop/PC has a CD-ROM (or DVD).
so, now you have 2 computers, with CD-ROM support and without CD-ROM support.

Step 2:
Download this software pack (Komku-SP-usb.exe - Download) 1.47MB
Mirror Depositfiles
Mirror Rapidshare
Mirror Easy-Share
Mirror Megaupload
If their is any problem in download, just tell me i will send that software to you. Otherwise you can search on google.
this software pack contains 3 application :

-BootSect.exe (Boot Sector Manipulation Tool)
-PeToUSB
-usb_prep8 (Prepares Windows XP Setup LocalSource for Copy to USB-Drive)

Step 3:
Double click Komku-SP-usb.exe

a window will appear... and click Install


Step 4:
Insert your USB Flash Drive.
When I made this tutorial, I was using 4GB Transcend USB FlashDrive...

Locate folder C:\Komku\PeToUSB\
double click PeToUSB.exe


a window will appear like this...


Destination Drive : select USB Removable
check on Enable Disk Format
check on Quick Format
check on Enable LBA (FAT 16x)
Drive Label : XP-KOMKU (or whatever you want)
then click Start

 Click Yes to continue....


 "You are about to repartition and format a disk. Disk: .... All existing volumes and data on that disk will be lost. Are You Sure You Want To Continue?"
click Yes


 Wait a few seconds...
Click OK, and you can close PeToUSB window.

Step 5:
Open Command Prompt ...
Click Start > Run > type cmd > click OK

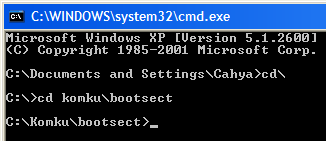
On Command Prompt window, go to directory C:\Komku\bootsect\how to do this?
first type this cd\ and press Enter

then type cd komku\bootsect and press Enter
 the result...
 
Don't close Command Prompt window, and go to step 6...
 

Step 6:
on command prompt window, type bootsect /nt52 H:

 H: is drive letter for my USB Flash Drive, it may be different with yours...

and press Enter

the result... "Successfully updated filesystem bootcode. Bootcode was succesfully updated on all targeted volumes."

 
don't close Command Prompt window, and go to step 7...

Step 7:
now type this cd.. and press Enter

 then type cd usb_prep8 and press Enter
 type usb_prep8 again... and pres Enter

Step 8:Your command prompt window will look like this

Press any key to continue...
usb_prep8 welcome screen will appear

 
Prepares Windows XP LocalSource for Copy to USB-Drive:

0) Change Type of USB-Drive, currently [USB-stick]
1) Change XP Setup Source Path, currently []
2) Change Virtual TempDrive, currently [T:]
3) Change Target USB-Drive Letter, currently []
4) Make New Tempimage with XP LocalSource and Copy to USB-Drive
5) Use Existing Tempimage with XP LocalSource and Copy to USB-Drive
F) Change Log File - Simple OR Extended, currently [Simple]
Q) Quit

Enter your choice:_

now, insert your original Windows XP CD to your CD/DVD ROM
and back to Command Prompt window

type 1 then press Enter...
"Browse For Folder" window will appear, select your CD/DVD drive and click OK

the result... "XP Setup Source Path" changed to G:\ (yours may be different)
 
now for point 2, if letter T is currently assigned to a drive in your computer, you must change it.... if not, leave it as it is
how to change it?
type 2 and press Enter...


 "Enter Available Virtual DriveLetter"
for example you doesn't have drive Sso you type S and press Enter

back to usb_prep8 welcome screen...
now type 3 and press Enter...


"Please give Target USB-Drive Letter e.g type U" Enter Target USB-Drive Letter:
because my Flash drive letter is H


 so, type H and press Enter...

after back to usb_prep8 welcome screen...
now type 4 and press Enter to make new temporary image with XP LocalSource and copy it to USB Flash Drive
please wait a few seconds..


"WARNING, ALL DATA ON NON-REMOVABLE DISK
DRIVE T: WILL BE LOST! Proceed with Format (Y/N)?"
type Y and press Enter
please wait....
when format virtual disk complete, press any key to continue...

 please wait... making of LocalSource folder is in progress...
 when "Making of LocalSource folder $WIN_NT$.~LS Ready"
Press any key to continue...

 "Copy TempDrive Files to USB-Drive in about 15 minutes = Yes OR STOP = End Program = No"
Click Yes, and wait...

 
"Would you like USB-stick to be preferred Boot Drive U: bla... bla..."
Click Yes


"Would you like to unmount the Virtual Drive ?"
Click Yes, wait a few seconds, and press any key....
press any key again to close usb_prep8...


Now, your USB Flash Drive is ready...

Step 9:
Now, insert your USB Flash Drive/Flash Disk/Thumb Drive to your notebook
go to BIOS and make USB HDD (or USB ZIP in some other machine) as primary boot device....

then boot form your USB Flash Drive....
and select "TXT Mode Setup Windows XP, Never unplug USB-Drive Until After Logon"


After Hard Disk detected, delete all partition, create single partition... and install Windows XP on that partition...
and wait...


once text mode setup is complete, computer will restart....
this time select "GUI Mode setup Windows XP, Continue Setup + Start XP"


Continue Windows XP setup.... and Done!
Windows XP Installed....


You can use this tutorial to install Windows XP on all computers.. using  any Flash Drive....
Share your experience here......:)
 

How to Remove Autorun.inf Virus from USB Drive

How to Remove Autorun.inf Virus from USB Drive. If you are using pen drive and any other media storage devices then you might come across Autorun.inf Virus. If your computer infected with autorun virus, you will get a wizard when you double click on a drive (pen drive or memory card etc..). 

AutoRun is a Windows feature that allows files or programs to immediately run as soon as a removable media device, such as a USB stick or CD-ROM, is connected to a computer.AutoRun feature could allow malicious code to spread. One of the vectors by which the infectious Conficker, or Downadup, worm propagates is through pen drives / other removable storage medias. you can manually delete/remove the autorun.inf file using following steps.

Steps to Remove Autorun.inf Virus from USB Drive

Step 1. First you Restart your computer to safe mode ! Press F8 to get the menu (while windows starting ).
Step 2. Open command prompt ( Go to Start > RUN and type CMD)

- Go to the drive. ("cd e:" - use your drive letter )

- Go to the root directory (cd \ )

then change the attributes of the autorun file

attrib -h -r -s autorun.inf

-h = remove Hidden property
-r = remove Read only property
-s = remove System file property

Now you delete the file

del -h -r -s autorun.inf

Note : Only open that drive after the restart. Done !

Microsoft has fixed a problem that prevents users from selectively disabling AutoRun features in an effort to stop the Conficker worm from spreading. Microsoft said it recommends all customers to install the update, which affects all supported Windows versions.

If above solution is not working for you then you can get rid of the above autorun.inf virus by just downloading Microsoft latest patches for your windows version.

Update for Windows Server 2008 (KB971029)
Windows6.0-KB971029-x86.msu 

Update for Windows Server 2008 for Itanium-based Systems (KB971029)


Update for Windows Server 2008 x64 Edition (KB971029)

Windows6.0-KB971029-x64.msu

Update for Windows Vista (KB971029)

Windows6.0-KB971029-x86.msu


Update for Windows Vista for x64-based Systems (KB971029)

Windows6.0-KB971029-x64.msu 

Update for Windows Server 2003 x64 Edition (KB971029)

WindowsServer2003.WindowsXP-KB971029-x64-ENU.exe

Update for Windows Server 2003 for Itanium-based Systems (KB971029)

WindowsServer2003-KB971029-ia64-ENU.exe 

Update for Windows Server 2003 (KB971029)

WindowsServer2003-KB971029-x86-ENU.exe 

Update for Windows XP (KB971029)

WindowsXP-KB971029-x86-ENU.exe 

 
Designed and Maintained by