Showing posts with label Widgets. Show all posts

Intense Debate Comment System for Websites

IntenseDebate is one of the most popular and feature-rich comment system for WordPress, Blogger, Tumblr and many other blogging/CMS platforms.In this tutorial I am going to explain how to add IntenseDebate comment system to Blogger blog.
With IntenseDebate,you can do many things than your default comment system.These are some main features of IntenseDebate comments.


IntenseDebate features:

  • Comment Threading.
  • Reply-By-Email.
  • Email Notifications.
  • Commenter Profiles.
  • Moderation/Blacklisting.
  • Reputation Points & Comment Voting.
  • Plugins API.
  • OpenID.
  • Widgets.
  • Twitter Connect.
  • Facebook Connect.
  • RSS Readers & Tracking.

HTML Formatting

You can also customize your links and add some photos to your comments. IntenseDebate supports the following HTML tags: <a>, <b>, <i>, <u>, <em>, <p>, <blockquote>, <br>, <strong>, <strike>, <img>
ADD INTENSE DEBATE TO WEBSITE

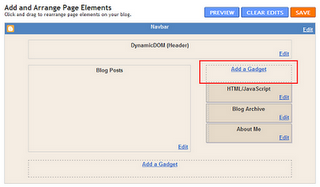
To add Intense Debate to your blog, you have to create an account at Intense Debate. After that you have to follow three steps.

1.In the First Step specify the address of the blog for which you want to add Intense Debate
2.In the Second Step, you have to select the Blog Platform. We will choose Blogger.
After clicking on Blogger comes the most important step. In Step Four you have to choose whether you want to install Intense Debate as a Widget or directly into the Template. Installing it as a Widget is easy but it can increase page load time. Choosing the Template option will reduce the load time but it is tough compared to the Widget option.
You also have to choose whether you want to install Intense Debate for all your posts or only the new posts. If you have many posts with comments then select the second option, otherwise your comments will be hidden.
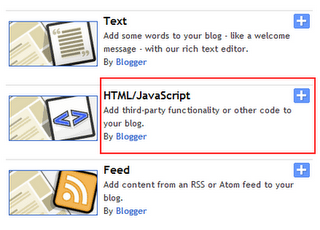
If you want to save your work, then choose the Widget option to install Intense Debate. When you click on the widget option, you will see some instructions which will tell you how to add it to your blog. Jump to the 4th instruction which contains the link “Add widget to my blog”. On clicking it, you will see your Blogger account on the right side. Select the blog for which you want to add Intense Debate and click on Add Widget. Thats it, and your work is over.
But it will be better if you choose the Template option as it will reduce the page load time. Before starting this step, it is better if you backup your template. Goto Layout>Edit HTML and click on Download Full Template. When you will click on the Template option, you will see some instructions below it. . After the download is complete, read instruction no.4 . In this step you have to select the template that you have just downloaded and Upload File.
On uploading the file, you will see a new set of instructions on the left side and your Blogger Dashboard on the right side. Jump to the 3rd instruction. You will see a box in which there is some code. Click on it to select it and copy it.
 Once you have copied the HTML code, go to Layout>Edit HTML and select Expand Widget Templates and replace the earlier template code with the one you have just copied. Now click on Save Template. Now you have finished installing Intense Debate to your blog.

Try it and share you experience with us...:)

Disqus Comment System for Website and Blogs

If you are looking to add more professional looking and functional commenting system to your Blogger, Wordpress or other blogging platform or you are a website designer who wants to add some third party comment system – checkout Disqus. It is a universal commenting system that is more user friendly and very easy to manage from Disqus interface.

Add Disqus to Blogger blog

1. Goto Disqus website and click get signup button.
2. Add your website or details like: URL, website name & short name and press continue button.


3. After registeration the next step is Setting apply settings according to your choice and click on Continue button


4. It will take you to Install tab. Select your blog type and follow instructions


5. If you are try to install it on Blogger platform then it will take you to next page.


6. You just need Login to Blogger and after login to blogger click on the the Add site "site_name" to Blogger button on diqus page shown in above pic.
7. It will redirect you to blogger. showing blog name , select you blog in which you want to intall the widget and click on the Add Widget button.

Thats its...:)
Check it on you blog or wibsite....:)

Related Posts Widget in Blogger With Thumbnails

Now Like wise Wordpress Blogger Users can also have Related Posts with Thumbnails in Blogspot Blogs.

To increase page views per user this widget can be very helpful, you can easily display the Related Posts with thumbnails below every post or below the post area with very ease.


For displaying the thumbnails you need not to worry about anything, this thing is taken care by the widget automatically, but you must have at-least one image in the post.


Follow the steps to display Related Posts Widget in Blogger With Thumbnails.

Step 1: First Login to your blogger dashboard and navigate to Layout > Edit HTML and check the "Expand Widget Templates" checkbox.
Step 2: Find the

              </head>

Step 3: Replace it with

              <!--Related Posts with thumbnails Scripts and Styles Start-->
              <b:if cond='data:blog.pageType == "item"'>
              <style type="text/css">
              #related-posts {
              float:center;
              text-transform:none;
              height:100%;
              min-height:100%;
              padding-top:5px;
              padding-left:5px;
              }
              #related-posts h2{
              font-size: 1.6em;
              font-weight: bold;
             color: black;
             font-family: Georgia, “Times New Roman”, Times, serif;
             margin-bottom: 0.75em;
             margin-top: 0em;
             padding-top: 0em;
             }
             #related-posts a{
             color:black;
             }
             #related-posts a:hover{
             color:black;
             }
             #related-posts  a:hover {
             background-color:#d4eaf2;
             }
            </style>
            <script src='http://blogergadgets.googlecode.com/files/relatedthumbs21.js'         type='text/javascript'/>
            </b:if>
            <!--Related Posts with thumbnails Scripts and Styles End-->
            </head>

Step 4: Find the either line given below

            <div class='post-footer-line post-footer-line-1'>
            OR
            <p class='post-footer-line post-footer-line-1'>

Step 5: Put the code given below immediately after the above one.

<!-- Related Posts with Thumbnails Code Start-->
<b:if cond='data:blog.pageType == "item"'>
<div id='related-posts'>
<b:loop values='data:post.labels' var='label'>
<b:if cond='data:label.isLast != "true"'>
</b:if>
<b:if cond='data:blog.pageType == "item"'>
<script expr:src='"/feeds/posts/default/-/" + data:label.name + "?alt=json- in-script&callback=related_results_labels_thumbs&max-results=6"' type='text/javascript' /></b:if></b:loop>
<script type='text/javascript'>
var currentposturl="<data:post.url/>";
var maxresults=5;
var relatedpoststitle="Related Posts";
removeRelatedDuplicates_thumbs();
printRelatedLabels_thumbs();
</script>
</div><div style='clear:both'/>
</b:if>
<!-- Related Posts with Thumbnails Code End-->

Now Save Template and View your blog you will find Results, if you don't see the images then keep patient it will show you withing 24 Hours.


Note: You can adjust the maximum number of related posts being displayed by editing this line in the code.

var maxresults=5;

5.To edit the title of the widget you can change this line of code:

var relatedpoststitle="Related Posts";

If you have any issue please comment here.

How to Add NetworkedBlogs Widget in Blogger

Create and Add NetworkedBlogs Widget in Blogger. Traffic generation is the main concerns for every publisher in the current social media and social networking ear. NetworkedBlogs is an extension of the NetworkedBlogs Facebook Application to make user-generated blog directory accessible outside Facebook and provide more exposure to your blogs.


I have took some screen shots and prepared step by step tutorial and by using it, i will show you how you can add NetworkedBlogs Widget in your Blogger blog or if you are familiar with wordpress then you can add it to the wordpress also. You will definitely generate some traffic after adding this widget in your blog because there are 500,000 Blogs network is waiting for you.

Steps to Add NetworkedBlogs Widget in Blogger


Step 1. Open this link - http://www.networkedblogs.com/ and click on Add your Blog button.


Step 2. It will now ask your for your Facebook credentials, enter your facebook user name and password and go ahead.

Step 3. Now Open this link - http://apps.facebook.com/blognetworks/editblog.php and Add your blog or site details in it (see below screen shot) and click Next button.


Step 4. It will ask for Are you the author of 'BLOG NAME'?, just click on YES button and move ahead.


Step 5. Now you need to choose the verification method to verify ownership of 'BLOG NAME'?

- Ask friends to verify you (easy, but takes a little time)
- Use widget to verify ownership (instant, but some technical skills required)

Click on Use widget to verify ownership (instant, but some technical skills required).

Step 6. Now Click on Install Widget >> button, and give the option to Copy the Following Code for Widget. Copy that code.

Step 7.Insert it into your blog template on the right-side column (not in a new post)

- To add the code in blogger, first Log-in to your blogger account and navigate to Layout >> Page Elements.


- Click "Add a Gadget"


- Paste the HTML code you copied from NetworkedBlogs into the text area and click save. You're done.


Step 8. Click on Verify Widget button on Networkedblogs page and done!

- So now install your widget in your blog and start getting some extra traffic using Networkedblogs.

 
Designed and Maintained by